Tagger Microscope Mechanical Design
A light-sealed enclosure for the Tagger Microscope is under design. The following requirements have been set forth to constrain it:
- hermetically sealed from light
- if possible, have the ability to work at all usable energies (not just ~9 GeV of GlueX)
- motorized, internal, 3-point adjustment to bring the fiber array plane to appropriate alignment with that of the electrons
- plan for SiPM amplifier board alignment to fiber waveguides (out of the electron plane)
- appropriate room for bending these stiff 2 mm square fibers
- pulser assembly for testing the Tagger without beam
- clearance from all structural elements in front of the scintillators to avoid multiple scattering and bremsstrahlung as well as minimal material downstream of the scintillators
Solutions to these is discussed below.
Managing 500 Fibers
In an effort to manage this large two-dimensional array of 5x100 fiber pairs (scintillator and its waveguide), it has been segmented into 20 fiber modules, 5x5 each. This is a convenient unit both mechanically and in terms of readout: on the electronics end the DAC supplying bias voltages to individual SiPMs have 32 channels and consequently, the SiPM bias and amplifier board has been instrumented with 30 SiPMs. (The two remaining channels have been reserved for DAC calibration and SiPM amplifier gain control.) Each fiber module with its 25 fibers is nicely paired with one board (leaving 5 spare channels). This arrangement also makes channel addressing very convenient. A 5x6 bundling with 17 resulting modules is another approach, and will likely be adopted if the spare channels per electronics set is not thought necessary.
The bundle of 25 fibers is glued together and then glued onto an aluminum strip with alignment bolts on both sides. The strips allow precise mounting and fastening onto a set of rails (described below). The current assembly plan requires each the modules to be inserted sequentially from one side along these rails in the positioned forced by the rail configuration. In most cases (when aligning to small crossing angles) the modules will be parallel to one another and may be aligned against each other.
3-point Fiber Array Adjustment
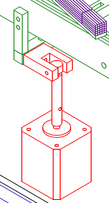
The simplest design for a 3-point adjustable plane on which the fiber modules would be mounted is to have it rest directly on motor shafts positioned vertically. The threaded shafts can lift and lower their respective points by mating them to a threaded through-holes on an elbow assembly that will keep that point fixed but flexible with respect to motion at other points of adjustment. The adjacent drawing shows how the shaft actually couples to the railing via two axles (the cylinder mating to the shaft and screw connecting the block to the rail structure) to allow for the motion at other points of adjustment.
In this arrangement friction on the thread due to weight of the load is the principle constrain on the choice of motor torque. A conservative approach to this choice would be to allow up to 5 lb of weight per support point, dry-sliding coefficient of friction between pieces of aluminum of 1.4, about 1/8" lever arm of the torque shaft. Torque capability an order of magnitude above that required to overcome the situation of these parameters (14 oz⋅in)
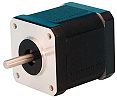
The 83 oz⋅in Lin Engineering 4118L-01 (1.9") Step Motor has been chosen. The unit is close in price to the lower torque models and does not exceed the 2 A limit of the inexpensive driver (meant for lower-end motors).
The combination of these devices have been found easy to control: the driver has simple direction and step resolution selection pins and uses TTL pulses as step commands. The shaft of the motor, which comes smooth (as in the adjacent picture) when bought from distributors. However, it tested to be more than soft enough to machine a flat into it. A cylindrical "sleeve" with threaded outer surface may be inserted over it and tightened against the flat by with set screws.
Adjustment to the Electron Crossing Angle
 |
|

|

|
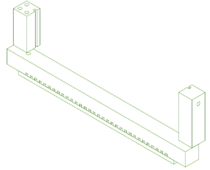
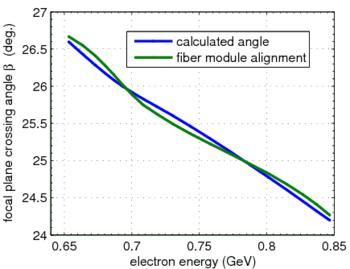
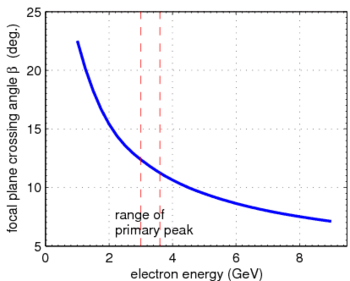
A simple dynamic parallel railing system was devised to allow flexibility for the electron crossing angle. In the range of useful photon energies (3-12 GeV) the crossing angle (measured from the focal plane) is calculated to change from 8 to 60 degrees. The figures above show plots of crossing angle dependence on electron energy. Diagrams are shown illustrating a set of "rails" kept apart by beams parallel to electron trajectory that allow proper alignment to the crossing angle. Additionally, in the high energy photon range (where electrons have low energy and and show steep angle dependence with energy) the errors accumulating from keeping the fibers parallel are no longer insignificant. The right-hand side of the parallelogram shown is actually equipped with a slot to allow the lower rail to rotate inward, deviating from this parallel arrangement. This allows a small angular shift from one fiber module to the next. The crossing angle plot for low electron energies shown above demonstrates a close match possible between the alignment of the fiber modules and the trajectory of the electrons. Thus the geometry of the rails specifies the alignment of the fiber modules.
Each rail mentioned above consists of two rigid metal strips spaced to allow a standard 4-40 bolt between them. Each module sinks two long 4-40 bolts (3" apart on the module) into the slot created between the two corresponding rails. They may be tightened against the rail from below, if desired.
Angles as low as 8 degrees require ~60" rails to fit all 100 channels. Rails made out of aluminum (chosen for the ease of machining and to keep the load on the adjustable supports light) will sag significantly compared to the thickness of the fiber, if they are supported on the edges. Optimized positions have been found (roughly 28% of the way from the edge) to minimize the sag. Also, thickening the rail in the direction perpendicular to the ground to the maximum reasonable degree helps significantly (the sag is inverse to the third power of this dimension). Using these methods, the calculated sag has been reduced to about 35 μm. The brackets shown in blue in the above illustration represent the mounting structures to which the motors (described above) are attached.
Coupling Waveguide to Photo-sensor
In the current design, each fiber module (containing a square bundle of 25 fibers) is paired with a detector PCB (referred to here as "analog" or "amplifier" card to distinguish from digital control electronics separately under design.) These circuit boards attach via EuroCard connectors to the ceiling of the tagger enclosure made up of special backplane boards. The 32 photo-sensors (SiPMs) form a row along the bottom edge of the card with amplifier and summing circuitry occupying the rest of it. This arrangement allows easy access for the fibers without interfering with the neighboring cards. A 32 "chimney" array block allows for prices alignment of the fiber waveguides to their SiPMs: the block is equipped with a card guide for the insertion of the amplifier board (already attached to backplane) The mounting holes for tightening down the backplane and those for mounting the chimney structure are arranged such that that the end of the amplifier board with the SiPMs arrives in alignment with the clear fiber waveguides held by the array of grooves in the chimney.
CAD Drawings
CAD Models
- Tagger Microscope (Assembled) TCW DWG STEP(zipped)
- Tagger Microscope Prototype (Assembled) (rought draft) TCW
- Motorized rail support mounting elbow TCW
3D views of the assembled Tagger
- Front View
- Side, perspective view from under beam plane
- Fiber module and railing close-up
- Railing support and adjustment motor structure
- View of "chimney" array for holding fiber waveguides against the photo-sensor/pre-amp PCB
Dimensioned Drawings
