

Next: Dead-time and Yield vs
Up: report
Previous: Method
The important rates that enter the Radphi trigger are shown in
Table 1. The first column shows the number that is
read from the instrumentation, for example a scaler. The value in
the second column, if any, is the corrected rate in the case that
the scaler is affected by an internal dead time. This is only
important for rates above several MHz. The predictions in the
last column are copied from Table 3 of Ref. [1].
Table 1:
The rates in all levels of the Radphi trigger from the
front end to the tape. The measured values were taken during 1999 running
with 5.5GeV electrons at 125nA and a double radiator each of nominal
 radiation lengths. This corresponds to
  tagged photons per second, to within 10%. The predicted values are
taken from Table 3 of Ref. [1].
| signal |
| scaler |
corrected |
predicted |
|
| |
| |
| tagger or |
| 30 |
| MHz |
| 50 |
| MHz |
| 48 |
| MHz |
| CPV or |
| 33 |
| MHz |
| 40 |
| MHz |
| 67 |
| MHz |
| UPV or |
| 550 |
| KHz |
| |
| |
| 750 |
| KHz |
| BSD layer 1 |
| 4.1 |
| MHz |
| 4.7 |
| MHz |
| 3.9 |
| MHz |
| BSD layer 2 |
| 2.4 |
| MHz |
| 2.6 |
| MHz |
| 2.0 |
| MHz |
| BSD layer 3 |
| 1.5 |
| MHz |
| 1.6 |
| MHz |
| 1.2 |
| MHz |
BSD
 |
| 900 |
| KHz |
| |
| |
| 440 |
| KHz |
 |
| 800 |
| KHz |
| |
| |
| 390 |
| KHz |
 |
| 750 |
| KHz |
| |
| |
| 150 |
| KHz |
The comparison between predicted and measured rate for the tagger OR
simply reflects the choice of beam current. All of the other comparisons
are a check of our understanding of the apparatus. There is excellent
agreement for the cpv (charged particle veto) and upv (upstream veto)
in spite of the fact that these counters are sensitive to the tune of
the machine. The predicted values were calculated assuming an ideal
(zero-emittance) electron beam. The calculation assumed that the CLAS
liquid hydrogen target is present and full, whereas during the measurement
it was present but empty. The difference between the calculation and
the measurement can be taken as an estimate of the effect of filling
the CLAS target on the charged-particle rates in Radphi.
There is an overall scale factor in the predicted BSD (barrel
scintillator detector) rates that depends on the setting of the
BSD discriminator. In Ref. [1] the discriminator setting
was taken to fall at the maximum of the minimum-ionizing peak in the
scintillators. Figures in that report show the difference in the
energy loss spectra for recoil protons and the minimum-ionizing
background from electromagnetic showers. Those figures can be
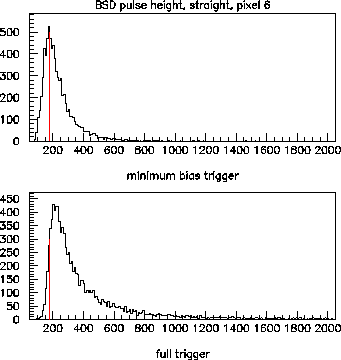
compared with Figs. 1-2 below. The Monte Carlo
did not include the effects of attenuation in the scintillator paddles.
The fact of attenuation implies that one must chose a position along
the length of the paddles where to set the threshold to the
minimum-ionzing maximum, and that where that peak falls relative
to the threshold will depend on polar angle, or  . The overlaps of
the barrel scintillators allow them to be divided longitudinally into
pixels of about 10cm in length. Pixel number increases with
  from
0 (upstream) to 7 (downstream). Pixels 0 and 7 are half-pixels. To
be safe, we chose to set the threshold in the middle of the MIP peak
for pixel 6 near the downstream end, as shown in Fig. 1.
The upper plot includes all triple-coincidences between the ORs
of the three BSD layers, with the BSD threshold set low to reveal the
minimum-biased spectrum. Most of these hits are MIP background.
The lower plot shows the same spectrum taken with the threshold set
at the operating point (indicated by the red line) and a trigger
that requires a large energy deposit in the lead glass. Most of these
hits are presumably recoil protons.
Figure 1:
Pulse height spectrum for pixel (triple-coincidence
between three overlapping counters) hits in the BSD, for different
trigger conditions. Pixel 6 is located near the downstream end of
the barrel, in the vicinity of  polar angle.The upper plot is
mainly electromagnetic background, whereas the lower plot is mainly
recoil protons. The red line indicates where the threshold was set
for normal running.
 |
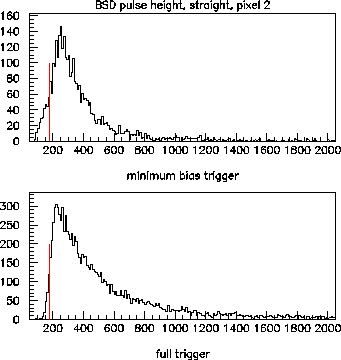
Figure 2:
Pulse height spectrum for pixel (triple-coincidence
between three overlapping counters) hits in the BSD, for different
trigger conditions. Pixel 2 is located near the upstream end of
the barrel, in the vicinity of  polar angle.The upper plot is
mainly electromagnetic background, whereas the lower plot is mainly
recoil protons. The red line indicates where the threshold was set
for normal running.
 |
Fig. 2 shows the same pair of spectra for hits in pixel
2, towards the upstream end of the counter. Here one can see the
increased pulse height relative to pixel 6, which results in a
decreased discrimination against background for upstream pixels, over
what was expected without attenuation in the Monte Carlo. As can
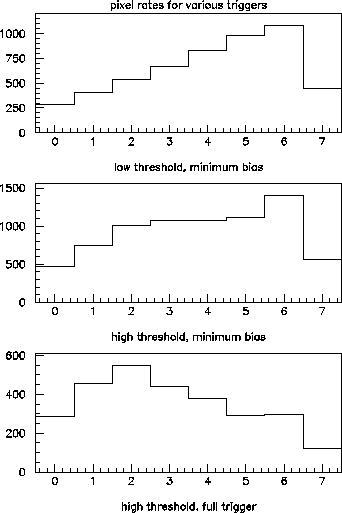
be seen in Fig. 3, the background rates are strongly peaked
downstream, which means that the sacrifice in background rejection
at the upstream end of the counter does not have too large an effect
on our overall level 1 trigger rate. The three independent layers
are hence 25% over the predicted rates, which can be roughly cubed
to obtain the factor of 2 in the measured triple-coincidence rate over
the prediction. We were careful during the test to ere on the side
of a low threshold, knowing that for the test we could raise it
offline. With the threshold taken into account, the agreement with
Monte Carlo is very good. At this point a more careful study can
be made using the t-slope for particular reactions and varying the
target diameter, to determine the threshold that optimizes between
dead-time and acceptance.
Figure 3:
Pixel hit distribution for various triggers, ranging from
minimum-biased at low threshold (top) to the physics trigger (bottom).
The distribution of minimum biased hits background is peaked towards
forward angles, as expected for electromagnetic background. The
bottom profile agrees well with the recoil proton angular distribution
from diffractive photoproduction. The middle plot shows what comes
in at trigger level 1, which is intermediate between the two.
 |
The tagging coincidence window was set to 30ns during the test
run. This contrasts with the 10ns gate that was assumed in the
Monte Carlo calculation. At present the alignment between the
different tagging channels and BSD elements does not allow an
efficient tag with a gate as narrow as 10ns. For the purposes
of accidentals subtraction it may prove valuable to keep the
online gate window somewhat larger than the actual coincidence
peak. With some effort cutting cables, we expect to be able to
reduce this gate width to 20ns.
The comparison between measured and predicted values for the
higher levels of the Radphi trigger are shown in Table 2.
Here the measurements are much better than the predictions, which
compensates for the excess at level 1 over expectation. The reason
for the large errors in the calculation is that this is the first
time we have run the Radphi trigger without a charged-particle
veto at level 1, and it turns out that estimates of leakage from
charged-particle events through the upper-level trigger decisions
were far too conservative. The net effect is that the rate of
events to tape is an order of magnitude lower than predicted.
Table 2:
Measured and predicted rates in the upper levels of the
Radphi trigger, under the same conditions as shown in
Fig. 1. The dead-time per event are average values
under high-intensity conditions.
| signal |
| measured |
predicted |
|
| |
| level 1 trigger |
| 300 |
| KHz |
| 73 |
| KHz |
| level 2 trigger |
| 6.2 |
| KHz |
| 8.3 |
| KHz |
| level 3 trigger |
| 80 |
| Hz |
| 1.0 |
| KHz |
| |
| |
| |
| |
| |
| level 2 dead time |
| 1.7 |
|  s/event s/event |
| 1.2 |
|  s/event s/event |
| level 3 dead time |
| 11 |
|  s/event s/event |
| 14 |
|  s/event s/event |
| daq dead time |
| 300 |
|  s/event s/event |
| 300 |
|  s/event s/event |
| total live time |
| 40% |
| @ 80Hz |
| 50% |
| @ 1KHz |
The majority of the experimental dead-time comes from the level-2
logic. The excess dead-time at level-2 per event over the
1.2 s that was foreseen was inserted to give adequate time for
the high-resolution TDC to fast-clear. A simple rearrangement of
our electronics is discussed below that will allow us to reduce this
dead-time by a factor of 2.


Next: Dead-time and Yield vs
Up: report
Previous: Method
Richard T. Jones
1999-10-29
