Darkbox Fiber Testing Setup
Purpose
The purpose of this document is to explain the procedure for setting up the UConn darkbox for fiber quality assurance testing. This entails hooking up the microscope electronics, connecting the power supplies, and cabling the readout crate.
Equipment
Power supplies
- 1 - 60V maximum
- 1 - 3 channel (+6V/+20V/-20V)
- 2 - 18V maximum
- The 18V supplies can be substituted with batteries in series
- These are used to increase the bias voltage from 60V to 96V
Power supply cables
- 4 - banana plug cables
- 4 - double banana plug connectors with additional banana plug openings
- Backplane power cord
- The end that has a rectangular, plastic block connects to the backplane. There is only one way it will fit
- The other end splits into 6 pairs of wires: the base color + the base color with a stripe. These have banana plug ends.
- LEMO cables
- 5 for the individual channel readouts
- 6 for the summed readouts
- 1 for the diode trigger
- 1 for the diode intensity feedback
TAGM components
- 1 backplane
- 1 control board
- 2 preamps
- 1 ethernet cable for the control board
- network hub for the ethernet cables
- 4 - #6-32 bolts and nuts
- 4 - #4-40 bolts and nuts
- 2 sets of chimney brackets (each set contains 3 pieces)
JLab readout crate
- adc with at least 12 channels
- discriminator
- trigger interface
- CPU (for CODA) with proper drivers
- 1 ethernet cable
Power Supply Setup
Power Supply Cable Connections
3 Channel Supply
- There should be a wire connecting the COM (GND) and ground (GND) terminals. Make sure that the terminal is tightened down sufficiently to hold the wire in place.
- Double-plug adapters with additional connection holes have been used previously to allow for multiple connections. These double-plug adapters look like two parallel male banana contacts sticking out of a single housing, usually black.
- Between the +6 and COM terminals.
- Between the -20V and ground terminals
- One side connected to the +20V terminal to allow for 2 connections. The other end of the double-plug was not used.
60V Supply
- Connect a double-plug adapter between the GND and (+) terminals
Connections between the 3 channel supply and the 60V supply
- There should be a banana plug cable connecting the 60V ground (GND) terminal to the three channel power supply’s COM terminal.
Connections between the 60V supply and the additional 18V supplies
- A cable should connect the 60V ground (GND) terminal to the 18V (or batteries) negative (-) terminal.
- A cable should connect the 60V negative (-) terminal with the 18V (or batteries) positive (+) terminal.
- To verify that the proper connections have been made, measure the voltage between the 60V ground terminal and the 60V positive (+) terminal. The voltages from the power supplies should have added to 96V once the 18V supplies or batteries have been added in series.
Backplane Power Cord Connections
3 Channel Supply
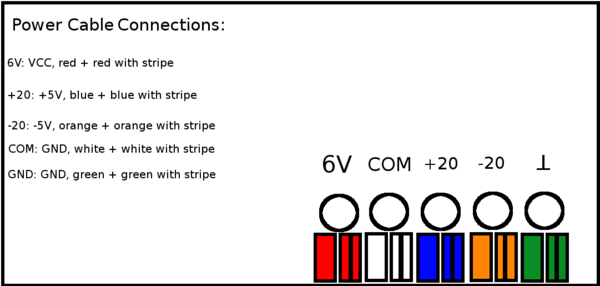
- The red and red-striped cables need to connect to the +6V (VCC) terminal of the three channel power supply.
- The orange and orange-striped cables need to connect to the -20V (-5V) terminal of the three channel power supply.
- The blue and blue-striped cables need to connect to the +20V (+5V) terminal of the three channel power supply.
- The white, white-striped, green, and green-striped cables need to connect to the ground (GND) terminals of the three channel power supply.
60V Supply
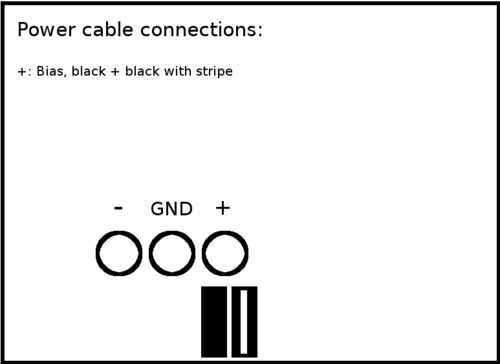
- The black and black-striped cables need to connect to the positive (BIAS) terminal of the 60V power supply.
Voltages and Currents
3 Channel Supply
- +6V: 5.84V, 0.22A
- +20V: 5.00V, 0.14A
- -20V: -5.00V, 0.00A
60V Supply
- 60V: Maxed at 60V, 0.00A
18V Supplies
- 18V: Maxed at 18V, 0.00A
TAGM Electronics Setup
Backplane installation
- Before mounting the backplane the preamp chimney brackets need to be installed.
- Between the chimney brackets and the backplate insert the aluminum shims.
- Secure these with screws from the outside of the backplate and darkbox.
- The backplane is oriented such that the preamp eurocard connectors stick into the darkbox and the control board eurocards are at the very end of the darkbox facing outward.
- There are 4 #6-32 bolts and nuts that secure the outer edge of the backplane to the darkbox.
- There are 4 #4-40 bolts and nuts that secure the inner section of the backplane to the dark box.
- One of these is difficult to tighten due to being close to a chimney bracket. Use pliers to hold it in place while tightening the bolt.
Control board installation
- 1 control board is needed
- Connect it to the middle eurocard on the outside of the microscope. The components of the board should be facing upward if the backplane was installed correctly.
- Connect an ethernet cable to the network hub and the other end to the control board. When powered the ethernet jack on the control board will light up.
Preamp installation
- !!! THE PREAMPS SHOULD ONLY BE INSTALLED ONCE THE FIBERS HAVE BEEN PLACED IN THE CHIMNEYS !!!
- Once the fibers are installed the preamps can be inserted into the chimney brackets.
- The preamps should be installed with the SiPMs oriented towards the top of the darkbox and the eurocard connector facing the backplane.
- Be careful of fibers sticking out too far. If the preamp becomes difficult to install DO NOT force it. Check that fibers are not blocking the path of a SiPM.
- Do not push the preamps all the way against the eurocard. Use the chimney bracket brace bar to push the preamp onto the eurocard. Simply attach the bar and tighten the bolts. The preamp will be properly located with respect to the chimney slots.
JLab Crate Setup
Install the crate
- Place the crate in the rack located in the clean room
- The crate should have:
- A CPU (with CODA installed)
- An ADC with special adapters for LEMO connections
- A discriminator
- A trigger supervisor
Cabling the ADC
- Connect the diode intensity LEMO cable from the back of the darkbox to the 0th ADC input
- Connect the five individual preamp readouts to ADC inputs 1-5
- Connect the 6 summed preamp outputs to ADC inputs 6-11
Cabling the crate
- The diode trigger LEMO cable should be connected to the discriminator
- The discriminator should be connected to the trigger interface.
- In the past this was a custom twisted pair from the 17-pair TRG of the discriminator to the 13-pair IN of the trigger interface.
- This may be different since this is a different crate
- The CPU should have an ethernet cable connecting it to the hub.

