Richard Jones, University of Connecticut
draft 1.0, January 31, 2006
Photon Tagger and Beam Line Working Group,
GlueX Collaboration

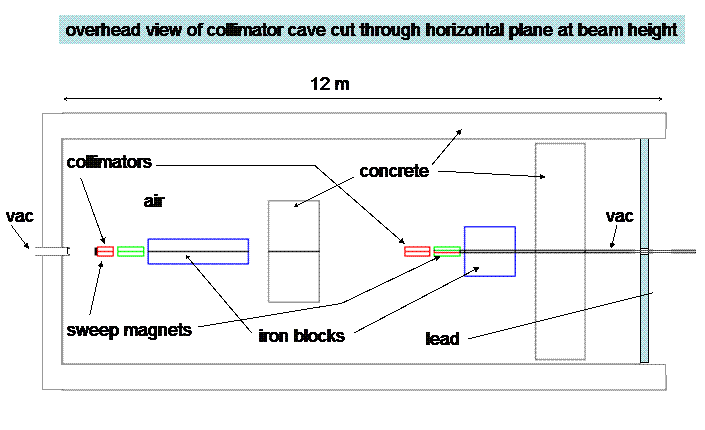
The collimator cave shielding is divided into structural elements (building walls, surrounding absorber materials) and installed shielding. The dimensions and weight of the primary installed shielding elements shown in the above figure are described in the table below. None of weights listed for beam line elements have included the weight of the tables or other structures that support them.
| material | outer dimensions | total weight | |
|---|---|---|---|
| primary collimator | tungsten | diameter 20 cm length 30 cm |
180 kg |
| primary sweep magnet | iron, copper, lead | length 50 cm width 20 cm gap height 2 cm |
300 kg |
| primary iron absorber | iron | width 50 cm height 50 cm length 200 cm |
4000 kg |
| primary concrete absorber | concrete | width 200 cm height 200 cm length 100 cm |
10000 kg |
| secondary collimator | nickel | diameter 20 cm length 50 cm |
140 kg |
| secondary sweep magnet | iron, copper, lead | length 50 cm width 20 cm gap height 5 cm |
300 kg |
| secondary iron absorber | iron | width 100 cm height 100 cm length 100 cm |
8000 kg |
| secondary concrete absorber | concrete | width 430 cm height 250 cm length 100 cm |
27000 kg |
| lead exit wall | lead | width 470 cm height 290 cm thickness 15 cm |
23000 kg |
The shielding plan for the Hall D collimator cave has been developed based upon beam line simulations. A range of shielding options were studied in the simulations, and the plan described above was found to be reasonably close to the minimum required to obtain acceptable background conditions in the experimental hall. However it can be seen from the figure that the size of the collimator cave was made somewhat larger than required by this shielding scenario. This was done to leave flexibility for increasing the amount of shielding if experience with real photon beams in the hall shows it to be necessary. In the simulation studies, another configuration was studied that had substantially more iron in the cave. This so-called heavy shielding option required more space along the beam line and increased somewhat the load on the floor. The heavy shielding option was compared with the moderate shielding configuration described above and was shown to result in modest background reductions. Nevertheless it was deemed prudent to maintain enough space and floor load capacity so that the heavy-shielding option could be exploited if background conditions in the hall prove it to be necessary. The distribution of floor weight-bearing capacity shown in the figure below is compatible with either shielding option.

This material is based upon work supported by the National Science Foundation under Grant No. 0901016.